Compiling Rsync with Resource Fork Support
This page contains resource links and information for compiling rsync to support resource forks on Mac OS X systems. If you have instructions on building an rsync binary which includes HFS+ suport then please submit a link to your instructions on this page. If you do not have somewhere to host your instructions then either contact us or create a new page in the LBackup developer documentation.
- Visit the screencasts page to visually learn how to download, compile and install rsync on Mac OS X.
- Screen cast name : Installation Process : Mac OS 10.4.x and later
Pre-Built Binary (Mac OS X)
The link below is useful if you simply want to install rsync on Mac OS X and do not want to compile rsync yourself from source.
Compilation Instructions for Rsync v3 with Mac OS X MetaData Support
Below are some basic instructions for compiling rsync version 3.1.1 with various Mac OS X support.
Please note that these instructions are for Mac OS versions 10.4.x - 10.8.x. If you are running Mac OS 10.3.9 then it is recommend that you use the pre-compilied version of rsync which is available from the download page. Also, please note that these instructions may not result in a version of rsync which offers all the meta-data preservation you require. If you have any questions then please post a message to the LBackup discussion mailing list or contact us directly.
Finally, because Mac OS 10.6.x and later adds additional meta data (space saving compressed binaries) you should only use rsync compiled with the instructions listed below if you intend to preserve Mac OS X file attributes of user data without compressed binaries.
Install Developer Tools
This step may involve downloading the latest version of developer tools from the Apple Developer Site or by Installing Xcode from the Apple AppStore. This is by far the most time consuming part of this process. Once you have the developer tools installed, compilation of rsync v3 with patches on a recent intel machine and DSL connect should take less than 2 minuets.
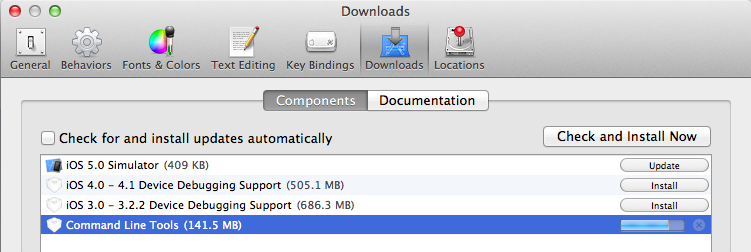
- Note : If you have installed Xcode 4.4 or later then you will need to install the command line tools as separate step. Further details are availible from this external link. For reference a screen capture of the installation in process (via Xcode) is shown below. The screen capture is from OS X (10.8, AKA Mountain Lion). If you install the command line tools via Xcode must launch 'Xcode.app', then open the 'Preferences' (under the Xcode drop down menu). Next click on the 'Downloads' tab (within the preferences). Finally, select and install the 'Command Line Tools'

- Note : The other approach to installing the command line tools from Apple is to login with a developer account and then search the downloads for 'command line tools', next download and install the package directly from the developer site.
Once you have the developer tools (Xcode and depending upon your version of Xcode the Developer 'Command Line Tools') installed on your system, open the Terminal /Applications/Utilities/Terminal.app and enter the commands listed below. The instructions listed below should be entered into a BASH shell. The default shell on Mac OS X is BASH.
New Versions
When new versions of rsync are released, these instructions may not work. An error such as gzip: stdin: not in gzip format may be displayed, when you are following the instructions below. If you have such issues visit this link and check to see if a later version of rsync has been released. If there is a later version of rsync available, then you may need to modify these instructions in order to use the latest version of rsync which are available from the rsync servers. If you contact us, then we will promptly update these instructions.
If you are behind an http proxy
Replace the username, password, proxyserveraddress and proxyport with the varibles which are appropriate for your network.
export http_proxy="http://username:password@proxyserveraddress:proxyport"
Download and un-archive rsync and its patches
cd ~/Desktop
curl -O https://rsync.samba.org/ftp/rsync/src/rsync-3.2.2.tar.gz
tar -xzvf rsync-3.2.2.tar.gz
rm rsync-3.2.2.tar.gz
curl -O https://rsync.samba.org/ftp/rsync/src/rsync-patches-3.2.2.tar.gz
tar -xzvf rsync-patches-3.2.2.tar.gz
rm rsync-patches-3.2.2.tar.gz
cd rsync-3.2.2
Apply patches relevant for preserving Mac OS X metadata
patch -p1 <patches/fileflags.diff
patch -p1 <patches/crtimes.diff
Configure, make and install
./prepare-source
./configure --disable-openssl
make
sudo make install
Verify your installation
/usr/local/bin/rsync --version
Note : If you would like to have multiple versions of rsync installed on a signal system then naming each one for easy recognition may be good idea. For example, you could have two versions installed /usr/local/bin/rsync_v3.0.9 and /usr/local/sbin/rsync_v3.0.8.
Using your compiled version of rsync with LBackup
Backups on Local Machine
This version of rsync and LBackup have the folloing issues with regards completing the backup bouncer test suite :
- Preserving extended attributes for sym-links
- Unable to hard link device files
The first issue relating to extended attributes for sym-links is the only issue which may affect people who wish to backup user data. The second issue may be problematic for people who wish to make use LBackup to preform full system backups. It is important to keep in mind that LBackup is not designed for full system backups.
Pull Backups Across the Network
Results are the same as on the local machine. However, in order to use rsync v3 for network backups when installed with the instructions outlined above you must edit your configuration file so that either the “ssh_permit_standard_rsync_version” option is set to “NO” or you must commented out this line in the configuration file. Failure to make this change in the configuration file will result in the standard version of rsync being used for this backup.
Relevant LBackup Network Backup Links
Links to Other Rsync Mac OS X MetaData Support Information
- Official Guide (–hfsmode)
- Mike Bombich compilation instructions for rsync version 3 (includes additional patches)


